Getting Started with Quarkus: A Guide to Application Creation

Before You Begin
To fully understand and appreciate Quarkus, I recommend reading the blog Java in the Age of Microservices and Containers. This article provides valuable insights into how Quarkus revolutionizes Java development in the modern era of microservices and containers.
Quarkus is a very developer-focused framework. It tries to give developers several options to generate a starting application depending on user preference. In this section, we explore different choices available for developing a new Quarkus application. You can easily apply these options to start building your business
We can create Quarkus applications in three distinctive ways:
1. Quarkus Maven plugin
2. Quarkus CLI (Command Line Interface)
3. The website’s graphical starter interface
1.1 Quarkus Maven plugin
To create a Quarkus application using Apache Maven, you can leverage the Quarkus Maven plugin (io.quarkus:quarkus-maven-plugin) and its create goal. By running the following command, you can quickly generate a new Quarkus project or
u can clone this project to test
 mvn io.quarkus.platform:quarkus-maven-plugin:create \
    -DprojectGroupId=com.example \
    -DprojectArtifactId=quarkus \
    -DclassName="com._15minuteconcept.HelloResource" \
    -Dpath="/hello"
This command sets up a new Quarkus project with:
- Group ID:
com.self - Artifact ID:
quarkus-in-action - Extension:
resteasy(for building RESTful web services).
You can customize the parameters to match your project needs, such as changing the group ID or artefact ID or adding additional extensions.
Quarkus uses the latest available Quarkus platform version. So we need to explicitly set older version used in this book declared by the -DplatformVersion system property.

To start your Quarkus application in development mode, you can use either of the following commands:
- Using the Wrapper Script
If your project includes the Maven wrapper (mvnw), you can start the application wih
./mvnw quarkus:devThis runs the Quarkus application in development mode with hot-reload functionality.2. Using Maven Directly
If Maven is installed on your system
mvn quarkus:dev
Outcome
- Your application will start in development mode, listening on the default port (
http://localhost:8080). - Any changes in your code will automatically reload without restarting the application.
Accessing Your Application
If your Quarkus application has a REST endpoint (e.g., /hello), you can access it at:
http://localhost:8080/hello
Enjoy coding with Quarkus! 🚀
2. The Quarkus Command Line Interface (CLI)
simplifies tasks like generating application code, managing extensions, and launching Quarkus. While its installation is optional, it’s recommended for convenience and is covered in Appendix B or at Quarkus CLI Tooling Guide.
To generate a Quarkus application with the same setup as the Maven plugin, use:
quarkus create app com.self:quarkus-in-action --extensions="resteasy"3 Generating Quarkus Applications from code.quarkus.io
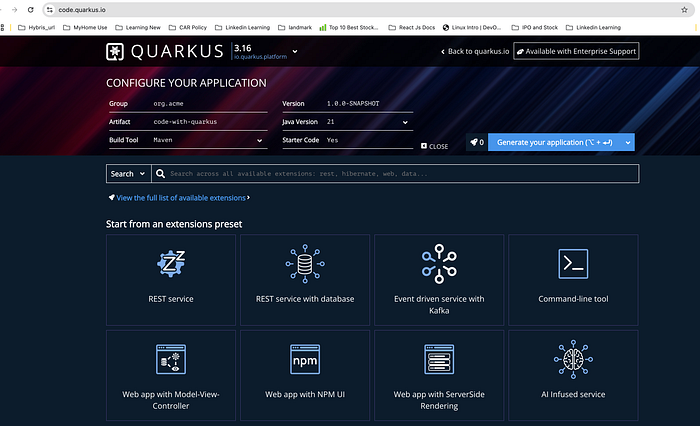
The Quarkus application generator at code.quarkus.io offers a user-friendly graphical interface for configuring and creating Quarkus projects. Users can set all application parameters through a visual form, making it ideal for those who prefer a click-and-configure approach.
Additionally, the tool provides a REST API to programmatically generate a ZIP file of the configured Quarkus application.
Project Structure of a Generated Quarkus Application
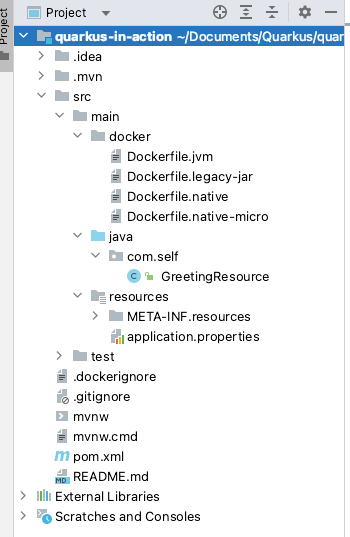
When you generate a Quarkus project using Maven, CLI, or the Web UI, the resulting structure will look like this
quarkus-in-action/
├── src
│   ├── main
│   │   ├── java
│   │   │   └── com
│   │   │       └── self
│   │   │           └── ExampleResource.java
│   │   └── resources
│   │       ├── application.properties
│   │       └── META-INF
│   │           └── resources
│   │               └── index.html
│   └── test
│       ├── java
│       │   └── com
│       │       └── self
│       │           └── ExampleResourceTest.java
│       └── resources
├── .gitignore
├── mvnw
├── mvnw.cmd
├── pom.xml
└── README.md
Key Directories and Files
src/main/java
Contains the main application code, including REST resources and business logic.
application.properties: Configuration file for the application.
META-INF/resources/index.html: Static resource example.src/test/java
Contains test classes, such as unit or integration tests
2.pom.xml
Maven build configuration file, including dependencies and extensions.
3.gitignore
Specifies files and directories to be ignored by Git.
4.mvnw & mvnw.cmd
Wrapper scripts to ensure Maven is available in the correct version.
This modular structure is optimized for developing, testing, and deploying Quarkus applications.
Maven Plugins
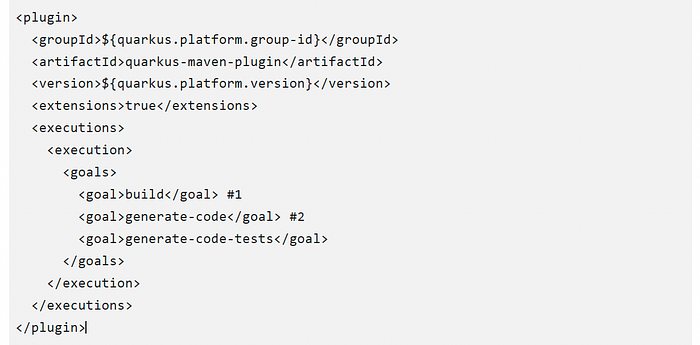
The quarkus-maven-plugin manages packaging and Dev mode lifecycle for Quarkus applications. It is included in the pom.xml and aligns with the project’s Quarkus platform version. Additional plugins like maven-compiler-plugin, maven-surefire-plugin, and maven-failsafe-plugin configure Java compilation and testing. These plugins enhance functionality, and more details can be found in Maven's official documentation at maven.apache.org.
Goals:
build (#1): Packages the application.
generate-code (#2): Generates application-specific code.
generate-code-tests: Generates test-specific code.

The Maven profile in the pom.xml customizes the Quarkus build process to generate a native GraalVM executable. Key configuration details include:
quarkus.package.type=native: Directs the Quarkus Maven plugin to package the application into a native executable file, enabling faster startup times and lower memory usage.skipITs: This property is used to skip the execution of integration tests during the build process. Instead, native integration tests run separately. These tests involve starting the native executable independently and invoking exposed APIs for validation.
This profile simplifies native application builds and testing workflows, making it essential for optimizing Quarkus applications for production deployment.
That’s it for now! In the next blog, we’ll explore how to generate a native JAR and build a Docker image. Stay tuned as we dive deeper into Quarkus, covering additional topics such as:
- Customizing the
application.propertiesfile. - Modifying Quarkus applications with custom code.
- Exploring more features and configurations.
Keep practicing, and see you in the next post! 🚀

