Upload Files Directly To S3 In React Using Pre-signed Url From Python.
I heard there was a time people don’t have Google translate. Pity! Luckily for programmers, there’s http for programming languages to talk to each other.
I recently implemented a UI for users to upload their logos, but I had two problems:
- I had to take all sorts of precautions to make sure files being uploaded into our server are not malicious files disguised as images.
- Also, why carry a load into our server and then carry it into an s3 bucket, why not upload directly into s3?
Using S3 presigned URLs, you can get your users to directly upload their content to S3 instead of using your backend server as a passthrough.
Using this method, you can reduce load on your own backend, while also providing a more optimal end experience for your users. Further, your client doesn’t need to have any special permissions to perform the upload — its just through a normal HTTP POST request.
This post will be thorough because I want it to be a one-stop-shop for anyone using S3 pre-signed urls with Python and JavaScript. Let’s get to it!
Glossary:
- Pre-signed url: A url that you can provide to your users to grant temporary access to a specific S3 bucket or an object in a bucket. Using the url, a user can either READ the object or WRITE an Object (upload). The url contains specific parameters which are set by an IAM user.
- IAM User: An AWS parameter that hold associated credentials and permissions to sign urls.
- Policy: Set of parameters which specify what an IAM user can or cannot do.
- Bucket: Cloud storage for static files.
Steps:
- Configure our s3 bucket
- Backend Setup
- Frontend Setup
1. Configure our s3 bucket
- First, we need an Amazon S3 account.
- Next click on Create Bucket
- Give the bucket a name and choose a region,
- Uncheck Block public access (bucket settings), otherwise it won’t let you edit the some permissions we will be setting. So uncheck it and confirm. You can recheck it after the uploads are working fine.
- Leave all the rest as default and click on Create Bucket at the bottom.
Voila! You got a beautiful bucket to hold your stuff. Next We will configure PERMISSIONS on the Bucket.
- Click on the bucket name in your bucket list
- Next click on permissions tap
Now we are going to set the parameters of the bucket.
- Scroll down to Bucket policy and click on Edit.
- Click on Policy Generator, which will open in a new tap.
Set the parameters as shown here:
- Select Type of Policy: S3 Bucket Policy,
- Effect: Allow,
- Principal: * (that’s an asterisk)
- Actions: GetObject
- Amazon Resource Name (ARN): arn:aws:s3:::BUCKET-NAME/*
- Click on Add Statement,
- Finally, click on Generate Policy
Copy the object generated and go back to the previous tab and paste it under Bucket policy. Here’s how it should look like:

- Click on Save Changes at the bottom.
Next scroll down to Cross-origin resource sharing (CORS) and Edit it.
Paste in the this snippet and Save it:
That’s it for the bucket permissions. What These do is to allow anyone to put and retrieve files from this bucket. We’re going to restrict access with IAM user and policy but on the bucket itself, we should allow in and out freely, so that it will allow access to the IAM, which we will set next. Type ‘IAM’ in the search bar.
Let’s create a policy which sets boundaries for an IAM user. So first, let’s create a policy that says, ‘Hey, allow this IAM user to put files in this specific s3 bucket’. Then we will create a user with that policy
- In the left panel click on Policy, then click on Create Policy.
- Click on Choose a service, type in s3 and select it,
- Under Access level, expand WRITE and select PutObject. (make sure you select only PutObject).
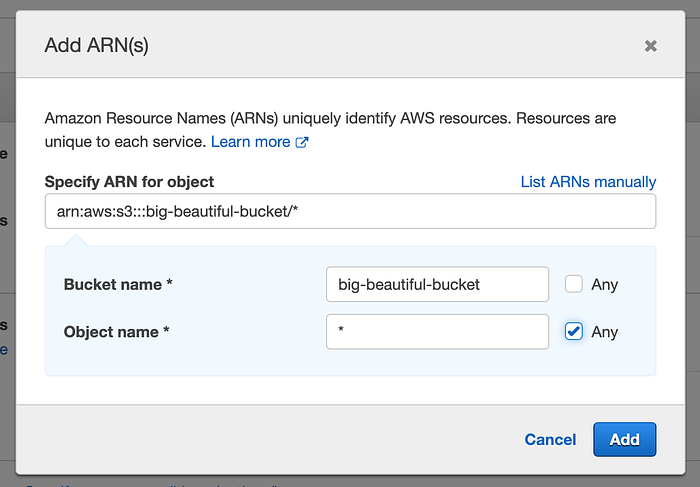
- Expand Resources and click on Add ARN,
- Type in the bucket name you want to give access to and select Any for the second field and Add, like this:
- Click on Next: Tags, Next: Review, type in a name for the policy. I like to give same name as the bucket to keep it simple: I named mine big-beautiful-bucket-policy.
- Click on Create Policy. That’s it!
Now let’s create a user.
- Select Users on left sidebar and select Add Users.
- AWS credential type: Select Access key — Programmatic access. This is what is going to generate access ID and secret key that we will use in Python to communicate with AWS and sign urls.
- Go to next step, Next: Permissions
- Select Attach existing policies directly
- Search for the policy we just made ‘big-beautiful-bucket-policy’ and select it,
- Then search s3 and select AmazonS3FullAccess,
- Click on Next: Tags >> Next: Review >> Create User
It will give you an Access key ID and a Secret access key, these are what we will use in Python to sign urls with. Let’s copy those are put them in our env variables.
2. Backend Setup
Now that we have our Access key ID and Secret access key, let’s see our Python setup. I’m using Graphene-Django for my API but any Python environment/framework will do.
Post & Get:
I am going to create two pre-signed urls, one for uploading (POST URL) and another for downloading (displaying) the image in the browser (GET URL). Not storing any files in the server but I still need to persist the filename so we can sign new GET urls on demand.
I am using boto3 SDK which is an AWS package to interact with their many services. Also I’m using dotenv to manage my env variables which I initialized in my settings.py module. So when you see I’m calling variables from settings, that’s why. Ok, here are the boto3 settings.
Boto3 documentation is not that great, so you may not see config in the setting, but you will run into random errors if you don’t include it as shown here.
Next, we need to generate the presigned url for uploading.
What to pay attention to:
- When you sign a url, boto3 will include the filename in the signature and will rename the file to that when uploading.
- Also, s3 allow only unique filenames, two users cannot upload files with same name, to avoid collisions, I make unique names for uploads. As you see above on line 3, I’m taking a random string to make unique names like
0DFCE80831535C11283D2.jpg
- The url will expires in 5 seconds. You can set longer expiry time but for uploading, 5 seconds is more than enough.
Here’s the function to sign urls for downloading the image:
What to pay attention to:
- The url will expire in 604800 seconds which is 7 days.
- Since this function does not check if the object is available in the bucket, we can sign both GET and POST urls at once as you will see below.
To make sure a user can have only one image in the bucket, we can use the delete function of s3. I also have few helper functions to properly make this whole process , that I would not explain (which you may not need anyway), but here’s the whole s3.py module.
Because the mutations don’t interact with the database, they use a generic type named InfoType. But this post is not about GraphQL, I only show it here because it’s what sits between the browser and the s3 module.
Frontend Setup
In React, I’m using Apollo client and two super simple functions to collect urls from Django and upload images to s3.
On line 37 I’m adding an expiry date so we won’t make unnecessary requests to the server before the url expires. Also, I’m setting to expiry to 6 day leaving one day as buffer in consideration of time zone differences.
Caveat
Amazon charge for both storage and requests send to and from your bucket, it will be worthwhile to look into caching the traffic.
Conclusion
There you have it, top to bottom s3 presigned url management in Django and React.